

Swamp Of Sacrifice Fallen Order
Star Wars Jedi: Fallen Order has 256 Collectible Locations needed for trophies & achievements, split up into 5 different categories. In total, in that location are 45 enemies, xix Encrypted Logs, 107 Chests, 32 Secrets (8 of which are Stim Canisters), and 10 Terrarium Seeds. The remaining 24 Secrets are Life / Forcefulness upgrades and likewise count towards the 75 Forcefulness Echoes, of which there are more than than you demand for the trophy. However, it's recommended yous notwithstanding take hold of all the extra ones because most of them are located in hidden locations which will help fill up out BD-ane'south Holomaps as you lot need 100% exploration in every expanse besides. Following this guide grant y'all 100% completion in all of the planet sub-areas, thus the related trophy
To unlock the Platinum bays, you need to browse all enemy types and Encrypted Logs, observe and unlock all Chests, find all Secrets, and observe and plant all 10 Terrarium Seeds. The guide beneath lists the locations to all Collectibles. The list has been organized by planet sub-areas.
Zero is missable! You tin can still find all Collectibles afterwards the story. You can also utilize the in-game Customization and Databank menu (  /
/ ) to determine what yous're missing.
Important: It's recommended to avoid everything except the Terrarium Seeds and scanning enemies during your story run. This guide has been written equally a walkthrough from the first to end of each area to make the make clean-upward every bit efficient and fast equally possible. If yous already got some Collectibles during the story it will be harder to follow along, so ameliorate not touch any Collectibles on your story playthrough. Furthermore, many Collectibles are unavailable on your outset run through each area and would make for excessive and unnecessary backtracking.
Annotation regarding Echoes: There are more Echoes in the game than are required for trophies / achievements (you need 75, nosotros found 113). At that place are even more this but they are not all part of this guide (anything you demand for trophies / achievements is consummate here). If you find more optional ones feel free to share them in the comments beneath. Additionally, this guide doesn't cover environmental scans for Databank entries as they aren't needed for trophies EXCEPT Cordova's Journeying.
Trophies & Achievements Earned from Collectibles:
Overview:
- 113 Force Echoes
- 107 Chests
- 32 Secrets
- 45 Scans (Located in Tactical Guide)
- 10 Terrarium Seeds
- 8 Stim Canisters
- xix Encrypted Logs
Guide past Darth_Krid & FranciRoosters
Empire Enemies (Every planet except Dathomir)
Tactical Guide:
- Lookout man Trooper
- Picket Trooper Commander
- Stormtrooper
- Stormtrooper Commander
- AT-ST
- Security Droid
- Flametrooper
- Heavy Assail Trooper
- Probe Droid
- Rocket Launcher Trooper
- Elecrobaton Purge Trooper
- Electrostaff Purge Trooper
- Purge Trooper Commander
- Electrohammer Purge Trooper
- The Ninth Sister
- The Second Sister
- *Spoiler* (Story-related; cannot exist missed)
Haxion Breed (Bounty Hunters) (Every planet later the Arena Battle sequence)
Tactical Guide:
- Haxion Brood Compensation Hunter
- Haxion Breed Commando
- Haxion Brood Bounty Droid
Planet: Bogano
Tactical Guide:
- Oggdo
- Bog Rat
- Splox
- Oggdo Bogdo
Expanse: Landing Pad
Surface area: Fractured Obviously
Surface area: Bogdo Sinkholes
Expanse: Hermit's Dwelling
Area: Great Carve up
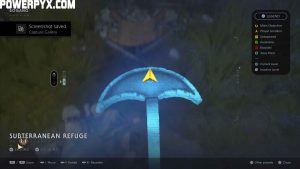
Area: Subterranean Refuge
- Terrarium Seed #two – Kalpi: From the area'south Meditation bespeak, drop downwards to the correct into the flooded surface area and kill the Bog Rat. Where it died, browse with
 to notice this seed.


- Echo #x – The Researcher – 8. Secluded Sanctuary. From the Meditation Betoken, facing indoors, drop to the correct and go through the entrance. Wall run to a ledge and and then find a very narrow path with ridge walls either side. Use both double jumps and wall runs to get to the summit of the steep slope and notice this Echo.


- Echo #11 – The Researcher – nine. Cordova's Padawan (Secret #iv). From the superlative of the steep slope, don't slide downwardly just instead wall run back the way you came and grab onto a vine. Swing to another vine, then angle yourself towards the left and jump to the wall. Run along this and double jump to a ledge, on which is this Repeat/Life upgrade.


- Echo #12 – The Researcher – 6. Meditation. From the Meditation Point, facing inwards, drib downwards a ledge to the right and use the right-near wall run walls to get around the corner and get to a platform with this Echo.


- Echo #13 – The Researcher – 7. Frustration. Use the wall right of the Meditation Betoken to get to a ledge. From this ledge, go along wall running until you get to some other ledge with the Echo.


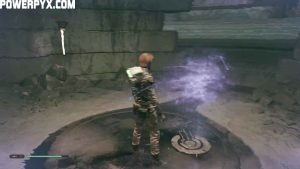
- Stim Canister #two (Secret #v). From the previous Repeat, plow around and look upward to see a stone yous tin can Strength Pull down. Climb up and onto the platform to discover this gold Breast. If you want this earlier in the game, go to the amphitheatre structure in Binog Mesa, use the walls at the back to reach the adjacent platform and from here drop into the big circular hole to land next to the Chest.


Area: Binog Mesa
Expanse: Ancient Vault
- Encrypted Log #4 – Archive Seven – Cheerio: ii. Secrets of the Vault. Unlocks as part of the story later on talking to Cordova's hologram in the Vault. Unmissable.
Area: Abandoned Workshop
Planet: Zeffo
Tactical Guide:
- Scazz
- Phillak
- Jotaz
- Skungus
- Tomb Guardian
- Rabid Jotaz
Area: Derelict Hangar
Area: Abandoned Hamlet
Area: Turbine Facility
Area: Gusty Bluffs
Area: Weathered Monument
Area: Auger Pulverisers
Area: Ancient Catacombs
Expanse: Ice Caves
Area: Windswept Ruins
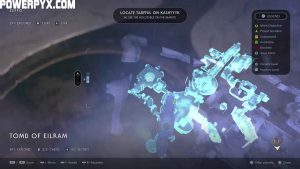
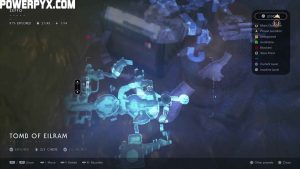
Area: Tomb of Eilram
- Encrypted Log #7 – Archive Four – Eilram: i. Tomb of Eilram. Story-related; cannot be missed. Information technology unlocks as Cal rides the elevator down into the tomb.
- Repeat #29 – Zeffo Culture – 5. Whispers. In the room with the outset giant sphere puzzle where you take to manipulate the wind to roll information technology into the centre, in the back left corner from where you enter.


- Repeat #30 – Zeffo Culture – 1. Meditation Relics (Underground #11). Solve the behemothic sphere puzzle past rolling the brawl into the middle. The central platform volition raise upward, revealing a room underneath. This Echo and Force Upgrade is in at that place.

- Encrypted Log #8 – Archive Four – Eilram: 3. An One-time Friend. Story-related; cannot exist missed. Unlocks after you learn Force Push.
- Repeat #31 – Zeffo Civilisation – four. Tomb Guardian. From the Meditation Signal, go through the sarcophagus room and in the next room, drib into the room on the left. Strength Push the rock, follow the path and Push some other couple of rocks until one drops downwards to the level below. Use this to climb the wall to the left, on superlative of which is this Echo.


- Chest #38 – Lightsaber Fabric (Silvian Atomic number 26). Right next to the Echo above (same screenshots equally above).
- Echo #32 – Sage Eilram – 2. Cleaved Artifacts. Go dorsum to the Meditation Bespeak and backside you is a wall you can at present destroy with Push. Go through, wall run and bound to the climbing wall. Go up, swing beyond the rope, jump to the side by side climbing wall and climb upwardly to this Repeat.


- Encrypted Log #9 – Archive Iv – Eilram: 2. Sage Eilram. From the Meditation Point, jump down and run frontwards into the area with the spheres and air current. Just after where the wind is bravado, climb upwardly the ledge to the right and become forwards. Scan the rocks underneath the behemothic current of air chinkle for this log.


- Chest #39 – Poncho (Outlander). In the sphere and current of air puzzle room, climb up high to the exit and slide down the ice and and so grab onto a rope. Turn around when swinging to meet other ropes. The Breast is sitting on a ledge near the 3rd rope where y'all'll want to land.


- Echo #33 – Zeffo Civilisation – three. Offerings (Secret #12). In the room with the Tomb Guardian. At the dorsum left Force Push the Skungus onto the gate in front of it and take hold of the Force upgrade.


- Breast #40 – BD-ane Skin (Balmgrass). Push the sphere from the lower level in the area near the Tomb Guardian, then freeze it with the Force. You lot'll find that a platform volition come down. Climb on information technology, and so put the sphere back to its location to make the platform go upwards. You'll find the Chest upward hither.


- Echo #34 – Sage Eilram – 1. Sage Training. On the ledge adjacent (same screenshots every bit higher up for reference) to the Chest higher up, amongst some pots.
Area: Imperial Headquarters
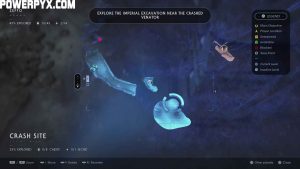
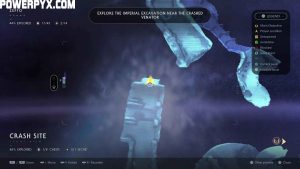
Area: Crash Site
- Echo #38 – The Zeffo Villagers – 8. Memorial. On the nearest isle to you when you enter the water, on the left. This Echo is at the tiptop of the small-scale hill.


- Repeat #39 – The Zeffo Villagers – 10. Drowned. Enter the cave next to the previous Echo and this one is directly ahead of you.


- Terrarium Seed #five – Dreamwort: At the back of the large isle in the centre of the h2o where you fight a Jotaz and a agglomeration of Scazz.


- Chest #43 – BD-ane Skin (Swoop). On the island with the two Phillaks at the back of the area.


- Echo #forty – Zeffo Culture – 8. Zeffonian Cranium (Undercover #13). When yous reach the Crash Site, go all the way to the right to detect a rope you can climb up with. Enter the area and utilise the pulverisers to get on top of the ledge with the Life upgrade Echo on top.


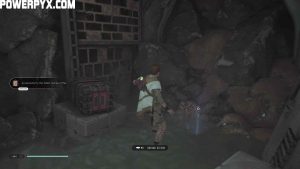
- Chest #44 – Poncho (Hyper Beat). When you accomplish the Crash Site, go all the way to the left to observe some grates you can climb onto adjacent to a Jotaz. Continue going all the way to the right until you see the Chest in the altitude.


- Chest #45 – Lightsaber Material (Polished Bronzium). Underwater, right of the slide that got you to this area of Zeffo, more or less below a cherry metallic part.

- Breast #46 – Poncho Material (Fjord). Underwater, from the slide that got you to this area of Zeffo, on the left side of the central structure with the Jotaz.
- Chest #47 – BD-1 Pare (Grungio). Same as above, merely on the right.

- Chest #48 – Lightsaber Emitter (Elemental Nature). Underwater, swim all the style to the back past the platform with the Phillaks.
- Breast #49 – Lightsaber Sleeve (Elemental Nature). In an underwater cave, basically below the Meditation Point.

- Chest #50 – Lightsaber Switch (Elemental Nature). From the slide that got you to this area of Zeffo, underwater, all the way to the left, near a climbable ledge.

Area: Broken Wing
Surface area: Venator Wreckage
Area: Imperial Dig Site
Expanse: Tomb of Miktrull
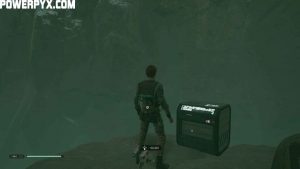
- Encrypted Log #10 – Archive Two – Miktrull: ii. Magnets. Equally soon as you enter the room when you need to fire the red vines using candles, press
 where BD-1 is pointing.


- Repeat #53 – Sage Miktrull – 1. Historic period of Extravagance. After a Meditation Signal, you'll have to climb upwards some vines. When you climb upwards, turn left and get all the mode to the stop of the area. Nigh a Tomb Guardian is this Echo.


- Chest #56 – Mantis Pigment Chore (Greezy Money). Next to the Echo above (same screenshots as above).
- Chest #57 – Lightsaber Material (Haysian Smelt). In the room where the sphere was suspended in the center and a waterfall, behind a Forcefulness Push wall on the left hand side of the wall of candles.


- Repeat #54 – Sage Miktrull – 7. Zeffo Soldier Remains (Secret #19). On the other side of the candle wall, get through the door, open the gate using Force Pull and and so go through and turn around to climb the vines on the door frame. At the top, jump to the co-operative on the right and over to this Force upgrade Echo.


- Echo #55 – Sage Miktrull – 3. Respected Symbol. At the other end of this room, use Strength Pull to grab a candle to burn the vines, then pace through to this Repeat.


- Echo #56 – Sage Miktrull – 5. Offerings to Miktrull. On the way to the central area with the sphere, this will exist correct underneath the second door yous have to open by pulling the counterweight and attaching it to the plinth. By a pot.


- Repeat #57 – Sage Miktrull – 4. Zeffo Labourer (Clandestine #twenty). In the section with lots of circular platforms and switches to change gravity, you lot'll see another section with a Skungus you have to Force Push into a breakable wall to grab this Life upgrade.


- Chest #58 – BD-1 Skin (Sumi). On the way back to the primal area, switch the gravity on the bridge then you tin can Force Pull a candle towards you lot. Now, look to your left over the bridge to the vines hiding a Chest below. Strength Button the candle to burn the vines (you may need several tries to do this), then work your way down to the Breast.


- Breast #59 – Mantis Paint Job (Zodiac Out-of-stater). At the stop of a subconscious section accessed past swinging on vines on the top level of the lantern room. In this area, yous have to solve a puzzle by turning off the gravity in a side room before using Strength Pull and Push to burn a candle through the giant statue'south mouth to fire vines.


- Echo #58 – Sage Miktrull – 2. Oppression. From the location where y'all picked upwardly BD-1 Skin (Sumi), run into the wall and pull the rope towards y'all to land where the Repeat is.


- Encrypted Log #11 – Archive Two – Miktrull: 1. Sage Miktrull. On the upper level of the circular room with glass dome you can raise with a rope, on the exterior in a room you Force Button through a wall to get at.


- Encrypted Log #12 – Archive 2 – Miktrull: 3. The Central to the Vault. Story related, gained when you complete the 'Raise the Spire" objective.
Planet: Kashyyyk
- Flame Beetle
- Wyyyschokk
- Jaw Found
- Slyyyg
- Saava
- Mykal
- Albino Wyyyschokk
Area: Cargo Pad
Area: Forest Trench
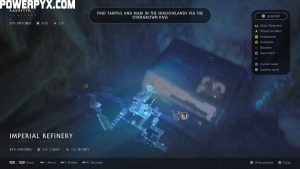
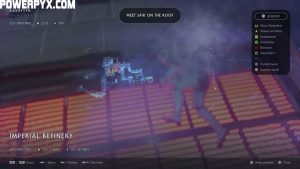
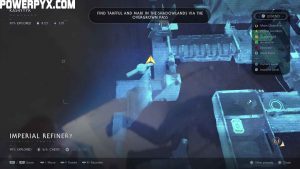
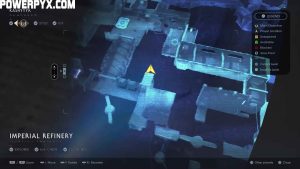
Expanse: Imperial Refinery
- Echo #62 – Regal Occupation – 10. Wookies in Hiding. From the Meditation Point, Strength Push the pipe to create a path, then go along on until you see some vines yous tin can cutting off with your lightsaber on your right. Enter the tunnel to find this Echo.


- Chest #62 – Lightsaber Emitter (Passion and Force). From the Meditation Signal, Forcefulness Push the piping to create a path, then drib downwardly to the platform where the Stormtroopers are. Plow around and use BD-one's Piece to open the Breast against the wall.


- Chest #63 – Lightsaber Material (Matte). In one case you enter the room where the Flametrooper kills the Flame Beetles, stay on the top level and use the Slice panel to open the door to this Chest. The door is on the correct.


- Chest #64 – BD-1 Peel (Stygeon Prime). Cut the cords to enter a 2d hidden area but meters abroad from the location above.


- Terrarium Seed #six – Bonshyyyr: Correct where y'all face a couple of Wyyyschokk (they are being simultaneously attacked by Flametroopers), against the wall left amongst a pile of woods shavings.


- Chest #65 – Lightsaber Fabric (Doonium). Just to the correct of the Seed above.


- Repeat #63 – Imperial Occupation – 2. Wyyyschokk Attack (Secret #22) – From the Meditation Signal in this surface area, don't drib down to where the Flamtetroopers and Wyyyshockk are fighting. Instead, stay on the top level and in the back left corner is an entrance to a dark cave, through which this Echo is.


- Chest #66 – Poncho (Commando). On the same platform as the above Echo.


- Repeat #64 – Royal Occupation – 6. Refinery Cells. When you get to the surface area with the turbine you can Forcefulness Slow, you'll accept to climb onto some grates to make it beyond to the adjacent surface area. The prompt to collect this Repeat volition appear as you lot shimmy across.

- Echo #65 – Majestic Occupation – i. Wookiee Revenge (Hush-hush #23). After pushing the push button that activates the cells and frees the Wookiees, go dorsum the way you came from and hang on the piping that is higher up the expanse with the turbine. This volition lead you to a new expanse with two fans yous'll have to Wearisome in order to detect the Strength upgrade Echo on the Stormtrooper corpse.


- Chest #67 – Mantis Paint Chore (Bounty Hunter). In the area with muddy water and a turbine, attainable later learning Double Jump.


- Echo #66 – Imperial Occupation – 3. Poisoned Wookiee. When yous go to the area with the void and a stationary turbine below, leap on the turbine and turn around to notice the corpse of a Wookiee and this Echo.


- Echo #67 – Imperial Occupation – 5. Wookiee Oppression. Climb dorsum the ledge, turn correct and use the red ledges and climbing grates to climb upwardly to another ledge. Don't go ahead to the fan in the yellow sap, only instead look up to the left and run across a grate yous can double jump to. The Repeat is at the peak here on a square platform.


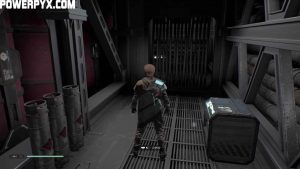
- Echo #68 – Imperial Occupation – 4. Slave Neckband. From where you lot find Royal Occupation – 11. Refinery Expansion (check the section below), do a wall-run and you'll observe this on a crate when y'all land.


Area: Overgrown Pass
Area: Kyyyalstaad Falls
Area: Kyyyalstaad Basin
Area: Gloomroot Hollow
Area: Origin Lake
Area: Shadowlands
Area: Deserted Village
Area: Origin Tree
Surface area: Gnarled Heights
Area: Chieftain'south Canopy
- Encrypted Log #15 – Archive Five – Astrium: 3. Astrium. Story-related when y'all accomplish the height of the Origin Tree. Unmissable.
Planet: Dathomir
- Blight Dorsum Spider
- Lesser Nydak
- Nightbrother Warrior
- Nightbrother Archer
- Undead Nightsister
- Nydak Alpha
Area: Upper Strangled Cliffs
Area: Strangled Cliffs
Expanse: Brother's Breastwork
Surface area: Complanate Settlement
Area: Halls of the Nydak
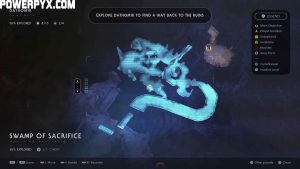
Area: Swamp of Cede
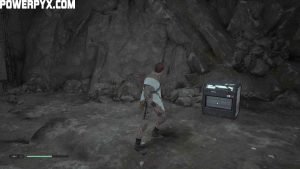
- Terrarium Seed #ix – Bleeding Gut: You'll slide downward a gradient and eventually have to jump down into the Swamp of Sacrifice. This is directly to the left once you drop downwardly.


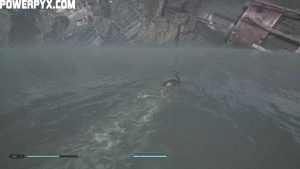
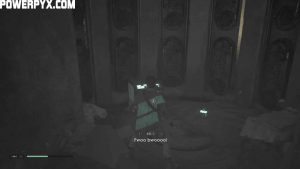
- Echo #92 – The Stranger – 3. Survivor. From the Meditation Point, expect to the archway and instead of dropping down, double jump to the platform higher upwardly at the lesser of the arch.

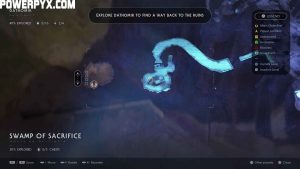

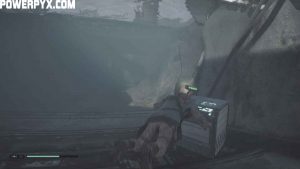
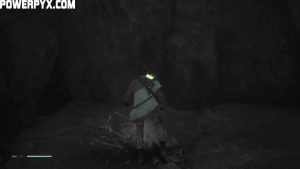
- Echo #93 – The Nightbrothers – i. Combat Loonshit. Become up to the left of the arch, onto the branch and and then drib down on the other side. This is in the oral cavity of the skull on the left.


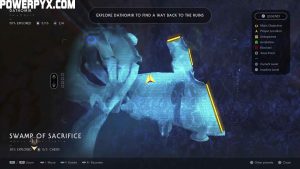
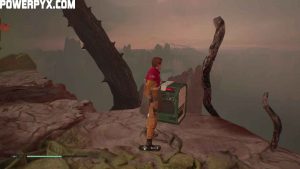
- Breast #92 – Poncho (Savannah). From hither, go around to the right to find this Chest y'all can Piece.

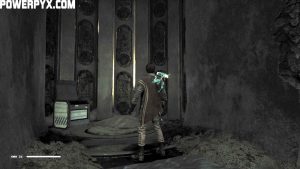
- Echo #94 – The Stranger – 2. Crashed Ship. Just to the left of the Chest, side by side to a tattered orangish flag.


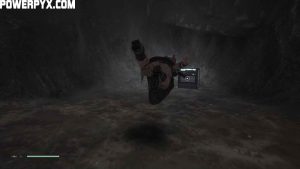
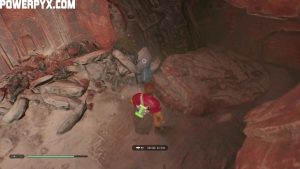
- Terrarium Seed #10 – Mushling: Across to the left is another surface area where a Bottom Nydak is roaming around and Undead Nightsisters spawn from hanging sack pods above you. Correct next to these sacks against the wall is the Seed.


- Breast #93 – Lightsaber Emitter (Ability and Control). From the Seed, go around to the correct and before the wall with vines, at that place's a Chest yous can Slice to the left.


- Breast #94 – Lightsaber Switch (Power and Control II). Hard to miss, after you walk beyond a co-operative and jump down into an area with glowing mushrooms.


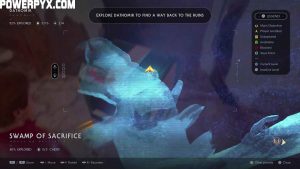
- Echo #95 – The Nightsisters – 7. Nightsister Mother. Don't apply Force Push on the rock with vines, merely instead climb upwards and to the right to detect a platform with this Echo.


- Echo #96 – The Wanderer and the Witch – i. Negotiation. Force Push and Wearisome the rock and then you lot can climb upwardly to the stop of a broken wooden bridge. Plough behind you and jump down and across to the platform to find this.


- Echo #97 – The Nightsisters – 2. Rituals. From the previous Echo, drib down the ledge to the left, run left and leap to the branch. On the platform at the end is this Echo.


Area: Witches Horn
Area: Nightbrother Dungeon
Area: Nightbrother Hamlet
Expanse: Nightmare Ruins
Area: Tomb of Kujet (accessible only when you visit Dathomir for the 2d time)
Planet: Ilum
Area: Shattered Lake
Area: Jedi Temple
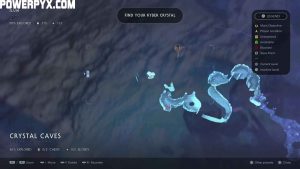
Surface area: Crystal Caves
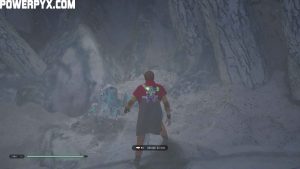
- Echo #110 – The Gathering – 3. Youngling Pride (Secret #31). From the Meditation Point, jump upwards to the nearby platform betwixt two Jedi statues, plough left, cut through some frozen icicles and follow the path until you slide down an ice slope and wall run to get to a platform. The Life upgrade Echo is here next to a rock yous can Forcefulness Push button.


- Repeat #111– The Gathering – 6. Youngling Lost (Underground #32). After going between the Jedi statues, get correct this fourth dimension, jump across the gap and become left to run across a rope yous can Strength Pull towards you. After a section of swinging, wall running and climbing, y'all'll achieve a pipe and can jump across to another one and and so onto the platform with this Life upgrade.


- Chest #105 – Lightsaber Sleeve (Ability and Control II). Swing back to the platform below and go straight ahead through a narrow archway. In that location'southward a Chest you can Slice open in here.


- Repeat #112 – The Gathering – 4. Youngling Afraid. Become up the ramp behind this Chest and wall run to a platform. Bound down to another platform and so to the climbing wall but instead of climbing up, get downwardly to a small ledge with this Repeat.


- Chest #106 – Lightsaber Switch (Power and Control). In the area with the puddle you have to dive into to go further into the temple, instead dive into the one backside information technology running horizontally across the platform. At one end is this Chest.

- Echo #113 – The Gathering – 2. Finding the Crystals. In the circular area with the lightsaber workbench, on the opposite side of the room from the demote.


- Encrypted Log #xix – Archive Seven – Farewell: 1. My Friend. Story-related. Unmissable. Information technology unlocks after the cutscene betwixt BD-i and Cordova in the Crystal Caves.
Area: Imperial Trench

Swamp Of Sacrifice Fallen Order,
Source: https://www.powerpyx.com/star-wars-jedi-fallen-order-all-collectible-locations-guide/
Posted by: beckwithandeping.blogspot.com
0 Response to "Swamp Of Sacrifice Fallen Order"
Post a Comment